- Walkthrough
- Collectibles
- Trophies
Walkthrough
Chapter 4: The Western Ghats
- 19 Treasures
- 9 Photo Opportunities
- 4 Optional Conversations
- 11 Lock Boxes
As shown by the map that you're forced to open, this whole chapter is one big area for you to explore at leisure. There's the main objective, which is going to the three fortresses, and there's the side objective of finding eleven tokens. The tokens are not necessary to progress the story so if you're in a rush just go for the fortresses.
To prevent the walkthrough from jumping all over the place the collectibles won't be arranged in the same order as the in-game list of treasures but I will still give them their original numberings. To see them in their in-game list order please refer to the Treasures section. The photos are also out of order.
Here is a map showing the path the walkthrough will be taking for the tokens and all of the collectibles along the way:
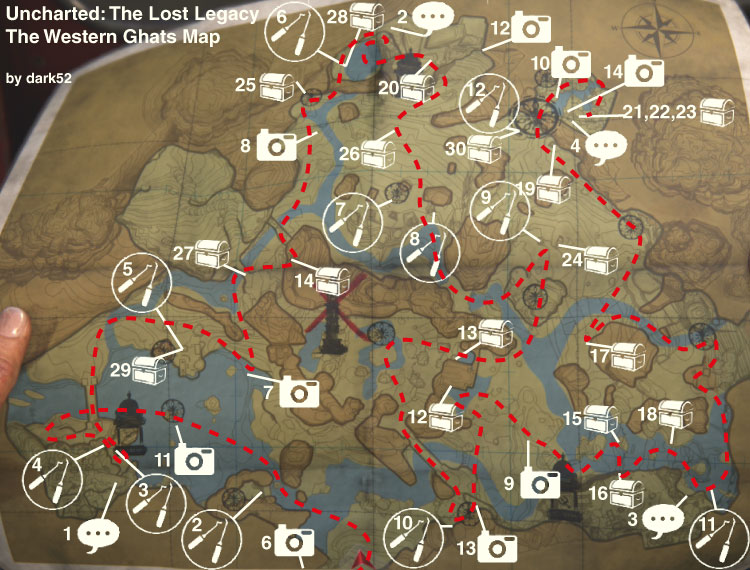
Photo Opportunity 6/28 - Western Ghats

Drive up towards the cliff edge a little then get out and take a photo. You won't be able to get back up once you've dropped down into the main area.
Get back into the Jeep and drive down the path to the right, dropping down. Turn left (if you drive off the waterfall on the left you'll get a trophy), drive across the water and into a canyon opening.
 |
Let's Not Get Caught |
|---|---|
| Drive over the edge in the Western Ghats |
Hoysala Token 1 - Winged Figure
When you reach the water here stop and get out, you should see a little birdcage-like stone object with a winged figure inside it. This is how you identify where there's a token hidden nearby, if you press Triangle when near it you'll mark it down on your map (if you visit an area in the north-east of the map you are given all of the locations for free but they're already on the above map so why bother?).
Just to the left of the marker are some ledges you can start climbing up, shimmy around and then jump up to a post sticking out of the cliff. From there you can rope swing five times without touching the ground (a trophy!) to get to another of the fragile looking walls. Throw a grenade at the wall to break it and you'll find the first of the eleven tokens inside.
 |
Tarzana |
|---|---|
| Perform 5 grapple swings in a row without touching the ground |
 |
Token For Granted |
|---|---|
| Find a Hoysala token |
If you don't have a grenade don't worry as the nearby Lock Box you swung over has a couple for you to use.
Lock Box 2/21

In the middle of the five rope swings. Contains two grenades and a Krivosk-XS.
Slide down the mud to get back to the car. Follow the water along to the north-west and you'll reach a large open water area. Keep driving north-west headed towards an elephant statue in the water.
Photo Opportunity 11/28 - Elephant Statue

Looking at the elephant statue in the water, in between the token marker and the post.
Hoysala Token 2 - Chicken
In between the marker and the pillar you can also find a slightly deeper section of water, if you swim into it and dive down you can find a tunnel that'll lead you straight to the token.
Now up on the left you can see a fortress, to get there drive straight on under the bridge and up the grassy slope on the left side. It'll loop up to the entrance.
Lock Box 3/21

Next to a truck outside the fortress. Contains an Arrowhead A3c, a Para .45, and a couple of grenades.
Drive the car as close as you can, giving yourself a little space in front.
Optional Conversation 1/17

Outside the fortress look up at the bow symbol above the entrance to trigger this.
Grab the winch and pull down the doors to head inside.
Bow Fortress
Clamber up the lone piece of man-made stone to leap to the ledges on the sides of the platform ahead. Climb up around the back to sneak up on the two rebels on top, or just shoot them as they peer over the side but you'll still need to get up to the top and it's impossible not to alert the next set anyway.
Jump to some more ledges and another pair of rebels will start shooting down at you, quickly shoot them while you're hanging on the side - they'll helpfully keep popping their heads out in the same places. If you run out of ammo just rapidly climb up and melee them.
From the top just jump straight over to the pillars and go through and up the stairs. After glancing at the "shrine" rope swing onto the cliffs and from the top jump over to the base of the tree you just swung from so you can climb into the main combat area of the fortress.
Loads of enemies patrolling the place but not much scope for hiding or even really getting out of the first bit of grass without being spotted but you should be able to just about make a jump to the sides of the building with the grassy area below if you're careful, from there you can make your way around the edge of the area as you please. There's an armoured China Lake GL carrier up on the tower at the back with a couple of shotgun guys walking about nearby. And for stealth you might like the Silenced Pistol inside the Lock Box.
Lock Box 4/21

Underneath the bridge to the "shrine". Contains a Silenced Pistol.
Once you've wiped out all of the enemies climb up to the tower that the grenade launcher was on and turn the crank to open the gate on the bridge. Follow Nadine through the gate and then rope swing off to the right once it collapses a bit. Walk to the far end of the grassy platform you land on and grab onto the ledges on the wall so you can move up to the right. At the top walk straight forwards to a small bit of stairs from which you can jump to some monkey bars and then swing to some ledges below Nadine.
The complexity of the rotating puzzle depends on the order that you did the fortresses in. As this is our first fortress it is the most basic form of the puzzle. Simply rotate each piece so that it forms a bow and arrow. Push the pole to finish.
[Cinematic]
To get back to the car you first walk down the steps and head to the left to jump over to where you were just before you got back up to Nadine. There's an open doorway now that leads to a rope swing which will take you to a slope just above where you parked.
Hoysala Token 3 - Lion / Lake Outpost
Cross the bridge and turn right to cross over the river at the waterfall. Get out of the car to approach the ruins on foot, there are a few enemies here to take out including a couple carrying rocket launchers at the back. Once you've taken them out you can blow up a fragile wall next to the marker in the north-west corner of the area (any explosives will do, grenade, RPG, gas canister). Sometimes the wall will already be blown up and the token hidden inside the nearby Lock Box, I believe that happens if you get the Forest Outpost token first.
Lock Box 5/21

In the outpost to the west of the central tower, across from the fragile wall. Contains a Krivosk-XS, a treasure and it sometimes contains the token.
 |
Five Finger Discount |
|---|---|
| Open 5 lockboxes |
Treasure 29/68 - Leather Covered Binoculars

Inside that Lock Box.
Going east out of the outpost go along the rocky cliffs that there's a zipline attached to.
Photo Opportunity 7/28 - Bow Fortress

Keep going along the edge of the cliffs until you reach just past the rock after the zipline, the photo op is on the edge here looking towards the fortress.
Go back towards the zipline and take the path to the right away from the fortress. This will lead you back to the river.
Treasure 27/68 - Engraved Gourd Jar

Underneath the root bridge.
Take a right after the root bridge and stop at the top.
Treasure 14/68 - Serpents and Ladders Game

Go up the steps on your left and climb into a room at the top.
Back out drive back down to the river and go right under the next bridge by driving up the rocks. Drive straight ahead over the river and after passing a red tree you should see a waterfall ahead.
Photo Opportunity 8/28 - Axe Fortress

The photo can be taken from next to the flowers just to the west of the waterfall.
Keep on driving north towards a taller but thinner waterfall.
Hoysala Token 4 - Horse
Get out of the car and climb up the wall on the left side of the waterfall. At the top you'll find a room with a rotating puzzle. To solve this you need to first get the three segments from the left into their proper positions in the circles. To do that first rotate the outer circle so that its gap lines up with the largest piece. Press Triangle to get that piece into position.
- Move the largest piece over to the right side of the puzzle to store it there.
- Put the second piece in its circle.
- Move the largest piece back to the left side of the puzzle.
- Put the second piece on the right side of the puzzle.
- Move the largest piece over to the right side of the puzzle again.
- Put the smallest piece in its circle. Rotated so the piece faces the right side.
- Move the largest piece over to the left side.
- Put the second piece in its circle again. Rotated so the piece faces the left side.
- And put the largest piece in the outer circle. Rotated so the piece faces the right side.
That should form a picture of a horse. The outer and inner circles should be lined up so their pieces face the right while the middle circle's piece faces the left.
With that solved the bars will raise to let you grab the token.
Treasure 25/68 - Jade Pendant

On the right side of the thin waterfall is another wall you can climb, up there is the treasure.
Follow the river to the left (not going down the waterfall) to reach a pool area with a truck.
Lock Box 6/21

On the truck is this Lock Box which contains a grenade, a Desert 5, and a treasure.
Treasure 28/68 - Butterfly Trinket

Inside the Lock Box on the truck.
Optional Conversation 2/17

Outside the fortress look up at the axe symbol.
Axe Fortress
Pull down the door with the winch again. Inside take a right at the tiger fight up the stairs and then jump down into the water. Swim to the left and dive down through the doorway, swim along the tunnel and out into the air. Climb up the cliff edge and collect a piton for you to use. You jump as if going for a ledge that isn't there and press Square to jab the piton into the pitted wall. Just like in Uncharted 4.
At the top follow the path to another piton wall then up to the right and off the edge (the piton wall ahead is not necessary) to drop into some more water. Swim through the short tunnel to emerge in a combat area.
You can dive down in the water to sneak up on enemies walking along the edges but be careful of other enemies spotting you as you do so.
Once you've emptied the area (or just any time you like) jump up the ledges at the back, up another piton wall and over the wall. Through there you'll see a staircase that leads to the first puzzle room. First activate the puzzle by pulling on the lever and standing on the square next to it. The puzzle is to get over to the other side without getting hit by the axe. To do that you need to count your steps so that you aren't standing on any of the vulnerable squares when the axe hits (the squares with the golden sun symbols on them). This room's fairly simple and just requires you to be on the second platform right after the axe swings. So here's a path you can take:
Forward, Forward, Right. Forward, Left, Back. Forward, Left, Forward. Forward.
And you're safe. Oh and there's a trophy for solving all of these puzzles without getting hit by the way.
Photo Opportunity 12/28 - Western Ghats Again

On the edge of the path after leaving the first axe room.
This second room has three statues in it and two different symbols. The silver symbol is for an overhead swing rather than a swipe and will affect the two squares in front of it. Your safe path is:
Forward, Right. Left, Forward, Left. Forward, Left, Forward. Right, Forward, Forward.
And immediately into the third room. The new statue type makes a quarter turn each move and slams the square in front of it that same turn. Anyway the solution is as follows:
Forward, Forward, Right. Left, Right, Right, Forward. Right, Forward, Right. Left, Forward, Right, Left, Forward. Left, Forward.
 |
Flawless Gauntlet |
|---|---|
| Get through all 3 Axe Fort trials without resetting any boards |
Out of this room you'll go up some steps to reach the rotation puzzle. As this is our second fortress it will be a little more complicated. Now the central circle moves the outer two, but all you have to do is line up that central circle with the other two and then move the outer one into its proper position. Push the pole.
[Cinematic]
Go down the steps for the puzzle and keep walking straight, you'll see a piton wall on the left for you to jump to and drop down a bit on. Then it's just a rope swing and a slip down a slope to get to the car.
Back down from the fortress drive into the pool of water and you should see a dark tunnel that leads directly underneath the Axe Fortress.
Treasure 20/68 - Metal Tiger Claws

In the middle of the dark tunnel underneath the Axe Fortress.
Take a right when you exit the tunnel to enter the forest area.
Treasure 26/68 - Nagfani Horn

In the middle of some trees in the forest straight ahead, there are a couple of short stone pillars marking it.
Turn to the south and drive towards the Forest Outpost.
Hoysala Token 5 - Lion / Forest Outpost
There's a sniper on the towers on the east and west sides of the outpost and a couple of shotguns wandering around but no heavy armour or RPGs around on this one. There's also a Lock Box with a Silenced Pistol inside on the eastern edge below the sniper.
Now because you already collected the token from the Lake Outpost the token won't actually be behind the fragile wall (unless you didn't, in which case it will be) but is instead inside one of the nearby Lock Boxes, the one on the truck to be precise.
Lock Box 7/21

On a truck just across from the fragile wall. Contains a couple of grenades, a China Lake GL, and sometimes contains the token.
Lock Box 8/21

On the eastern edge of the outpost, beneath the sniper tower. Contains a Silenced Pistol.
Drive through the tunnel in the water to the south of this area and you'll emerge beneath another outpost, this time with no enemies present.
Hoysala Token 6 - Elephant / Meadow Outpost
Climb up onto the building next to the elephant token marker and step out onto the short beam. You'll be given a prompt to use your rope, to move the lid you'll have to jump off the left side of the beam so that the rope catches on the end of the beam. Jump down the hole and grab the token.
As you start to climb out Nadine will give you the heads up that a group of rebels have arrived. Carefully climb out into the grass to take a look. Not too many enemies and no heavy weapons or armour other than a few helmets to deal with if you're going for headshots.
Once you've taken care of them all you should head over to the truck they arrived in.
Lock Box 9/21

On the truck that arrives after you open the token well. Contains a couple of grenades and a Silenced Pistol.
Treasure 24/68 - Hoysala Coin

On the eye of an elephant statue behind the truck.
Hop back into your car and follow the water to the south a bit, taking a right at the fork to go up some rocks.
Treasure 13/68 - Rosewood Spice Box

At the ramp that leads out to the next area get out of the car and walk along the bottom of the building on the left.
Continue up the ramp to emerge in the token area beneath the central tower.
Hoysala Token 7 - Sheep
Go to the middle of the small buildings where you'll find the token marker next to an interactable object. Press it and six fountains will appear. Your task is to step on each of them before the timer runs out, you've got the help of your rope to swing to most of the buildings but some will require you to climb up. Once you've stepped on the sixth one you'll have to quickly return to the middle to stand on it and earn your token. As long as you do them in a circle it shouldn't matter which way around you go.
Climbing the main tower here is entirely optional for the story as all it does is mark on the map where the three fortresses are and the place where you take the tokens. Useful information for sure but with the walkthrough you shouldn't need it. There is however a trophy for getting to the very top of the tower. Once you reach the room with the doors you can get higher up by climbing up the damaged door to the left of where you dropped in. Then make your way to the very top and stand there for a while until the trophy pops.
 |
Your Prize |
|---|---|
| Appreciate the view at the top of the Hoysala Empire |
Get back in the car and leave via the south-east exit, you should pass by a couple of small elephant statues as you go over a stone bridge.
Hoysala Token 8 - Peacock / Turret Outpost
Stop at the truck and get out, just behind it is another small outpost with a few enemies dotted around. It also has a turret at the back that any one of the rebels can take control of. It provides a shield from your shots so other than a direct headshot through a small hole you'll want to lob a grenade just behind it if you end up in open conflict. Once you've taken out the first lot climb up to the turret and start using it as a truck will arrive with another load of enemies. If you shoot the truck you should get most of them in the explosion. Any you miss should be easy to pick off with the turret.
Lock Box 10/21

Next to the turret. Contains grenades and a P90.
Chuck one of those grenades at the fragile wall to blow it up in order to find the token.
Photo Opportunity 13/28 - Trident Statue

Continue past the token out to a trident statue.
Jump back down to the car and drive down to the river. Cross the river going towards the left and you should spot a stone building covered in bushes.
Treasure 12/68 - Medieval Indian Lock and Key

This is on the southern part of the square base structure that's to the east of the central tower.
Start heading towards the waterfalls to the east.
Photo Opportunity 9/28 - Trident Fortress

On the flats below the waterfalls looking up towards the south-east fortress. Next to a pointy rock.
On the right side of the waterfalls are some rocks you can drive up.
Treasure 15/68 - Ancient Stone Jar

On a ledge the in between the second set of waterfalls.
Then continue up the path to the right of this second layer of waterfalls.
Treasure 16/68 - Trinket Box

On the path up the second layer of waterfalls.
Carry on up river.
Treasure 18/68 - Stag Horn Box

Next to a pillar on the platform to the left on the final slope to the top of the river.
Now that you're at the top you can enter the Trident Fortress.
Optional Conversation 3/17

Outside the fortress look up at the trident symbol.
Trident Fortress
Head on in through the open door to drop down immediately into some grass. If you're very sneaky you can earn a trophy for getting to the objective at the other end of the area without being spotted (you can kill enemies, just don't get spotted). There's a Silenced Pistol in an already open box in a building to the right near the start. If you do manage to get there without alerting anyone you'll get the trophy but everyone that you left alive will now start trying to shoot you.
 |
Quiet as a Mouse |
|---|---|
| After entering the Trident Fort, reach the door without being seen |
After pushing the button the bit of a puzzle here is to find all five of the other buttons. First one is on the floor in front of the main wheel. A second is on top of the building directly in front of that. There's a third one on the next building out in a straight line, this time it's vertical on the side of a little bit on top. A fourth can be found on a rock slightly further along that same line (it's an elephant shaped rock). And the fifth is further on on top of the building with the open lock box inside. There are some extra ones around but you only need five.
Go back to the wheel and go through to the third and final rotational puzzle. If this is your third fortress then the second circle will move the outer one as well but that's it really, just turn it so that it matches the outer circle, turn the centre circle and then turn the outer circle to fit. Easy.
[Cinematic]
Triangle tap your way out of the door and start heading back towards the start of the fortress. Partway back you'll spot some new enemies coming in, take them out how you like as there's no trophy associated with this part.
After they're gone climb up out of the hole to the right of the door to leave the fortress.
Lock Box 11/21

There's now two trucks outside the fortress, this Lock Box is in the new one. Contains some grenades and a China Lake GL.
If you head straight on across the water you'll see another token marker a short drive away.
Hoysala Token 9 - Boar
Climb up to the marker and then up onto the structure nearby. From there you can rope swing over a muddy slope trying to land on the one of the small platforms on it. From there slide down the slope towards the cave at the far end (or to a closer pillar if you landed further away). The token is inside the cave.
Slide down the slope and back into your car that Nadine has brought around for you. Follow the river and drive off the edge of the waterfall, head to the left along the cliff at the next waterfall.
Treasure 17/68 - Ivory Casket

Next to a tree on the curved path.
Turn the car around and now you can drive down that second waterfall to an area with several bells.
Hoysala Token 10 - King Cobra
Hopefully you've got some ammo left as you'll need it (if not there's a Lock Box with some in a short distance away) to shoot the bells. However before you do that first climb up the walls at the back so that you're standing next to a barred door and another bell. From up here you should be able to see all six bells on the floor. Shoot them. When you turn around there should be only one bar left in place, shoot the final bell up here to raise it and get the token inside.
Back in the car head north following the edge of the map.
Treasure 19/68 - Jade Archer's Ring

On the first tower you pass.
Lock Box 12/21

In front of the second tower and the entrance to the token redemption area. Contains a Krivosk-XS, some grenades, and a treasure.
Treasure 30/68 - Miniature Bronze Cannon

Inside the Lock Box in front of the token redemption area.
Head up the steps and through the archway.
Photo Opportunity 10/28 - Monkeys

At the edge looking at the monkeys.
Up to the left into the opening where you'll find a map of the whole area on the wall. Interact with the button in front of it to reveal a cage with an inaccessible prize inside and also open up a door on the left. In that room is the eleventh and final token, an Owl. If you'd come here without all of the tokens you'd be able to interact with the button again to place your current collection but there's no point to keep coming back here to do that with having them all. But since you have all eleven already interacting with the button will place all eleven and reward you with the Queen's Ruby.
 |
Yas Queen |
|---|---|
| Find all the Hoysala tokens and obtain the Queen's Ruby |
The Queen's Ruby will cause your controller to make a noise and the light bar to change colour when you are near to a Treasure and the bracelet's ruby will also glow in-game (you can change it in the options to make it only output through the speakers if you'd prefer, and you can just turn it off entirely). This would be helpful were you not following a walkthrough that tells you where everything is anyway.
Earning the Queen's Ruby will also open another doorway, go on through to meet the monkeys.
Treasure 21/68 - Silver Goblet
Treasure 22/68 - Hoysala Kukri
Treasure 23/68 - Inscribed Copper Plate

Inside the building the monkeys are hanging around in.
Optional Conversation 4/17

After walking past the treasures look up at a pillar to comment on the monkeys and this optional conversation will appear.
Photo Opportunity 14/28 - Monkey On Board

On the lower layer just in front of the treasure structure.
Make sure you get all of them as getting back here when you replay the chapter will still require you to find all eleven tokens.
Okay, that's everything collected and unlocked for the whole area. Time to head to the exit. To do that drive west through the forest until you reach the river, follow the river downstream until you reach the tree root bridge. Drive up the slope in front of it so you can drive over it and up the muddy slope on the other side. Go left at the top then loop around to the right to reach the top where you'll see the relief where all those waterfalls turned on. Climb on up.
[Cinematic]
And give the lever a push. Then walk on through to finally enter the next chapter.
[Cinematic]